State management is a common part of creating React components. While the useState hook is straightforward it can become cumbersome as your application logic grows, and more states are needed. That is where a reducer can help.
Introduction
Welcome to the 2000~ish! Web pages are becoming increasingly more complex, seeking better interaction with users (the term UX was not used that much back then) transforming further a media that originally was meant mainly to share information with others into a platform for application development.
Since the beginning of web development frameworks (jQuery, knockout.js, backbone.js to mention a few) state management has been a problem that needs to be solved.
The desktop was out, and the web was in. We had experience with desktop frameworks to create user interfaces. Java with the Java Swing, Microsoft with WPF, Qt and many others.
Although each library came with its own abstractions, classes, and functions, they all shared a common bit of code: An implementation of the Observer pattern.
The Observer pattern
Famously documented in their book Design patterns the GOF (Gang of Four, the authors of the book) they describe the observer pattern as:
Intent: Define a one-to-many dependency between objects so that when one object changes state, all its dependents are notified and updated automatically.
Also Known As Dependents, Publish-Subscribe
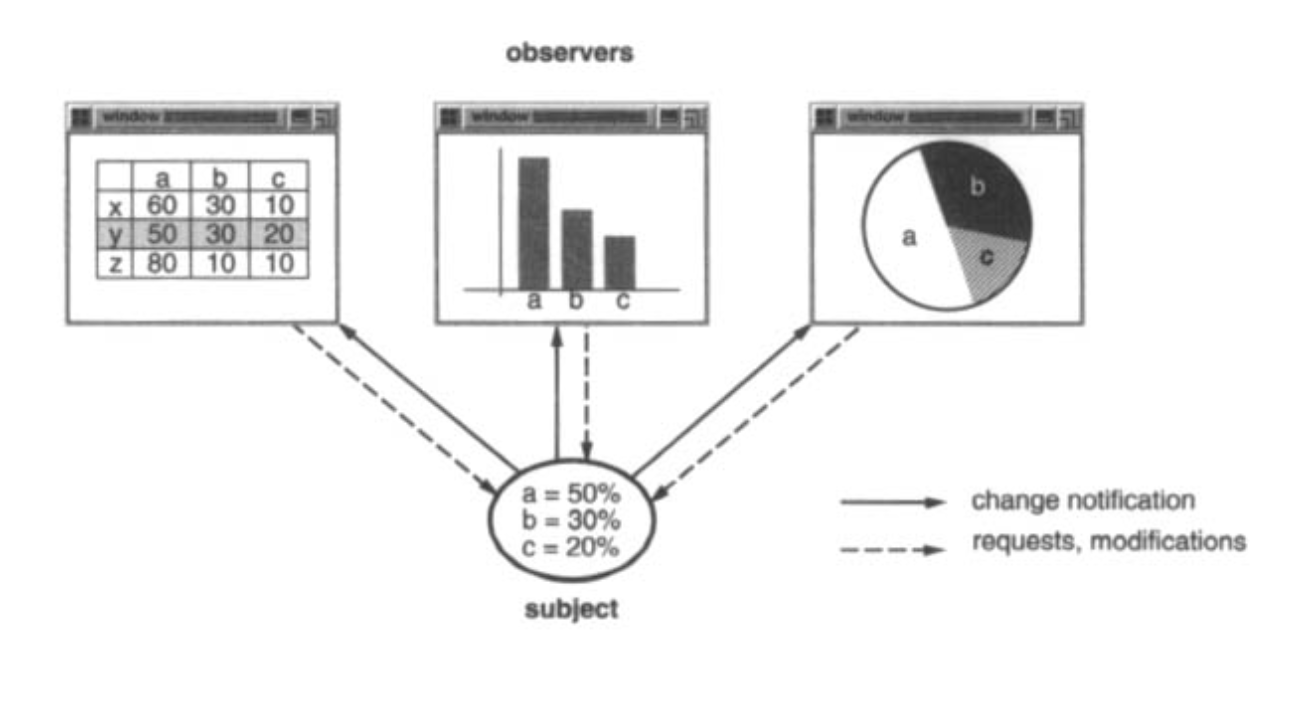
The Subject represents a model with information and the Observer represents somebody interested in get a notification when the subject changes in order to produce an update. The book example illustrated a model with percentages and three different ways to view the values, a table, a pie chart and a bar chart.
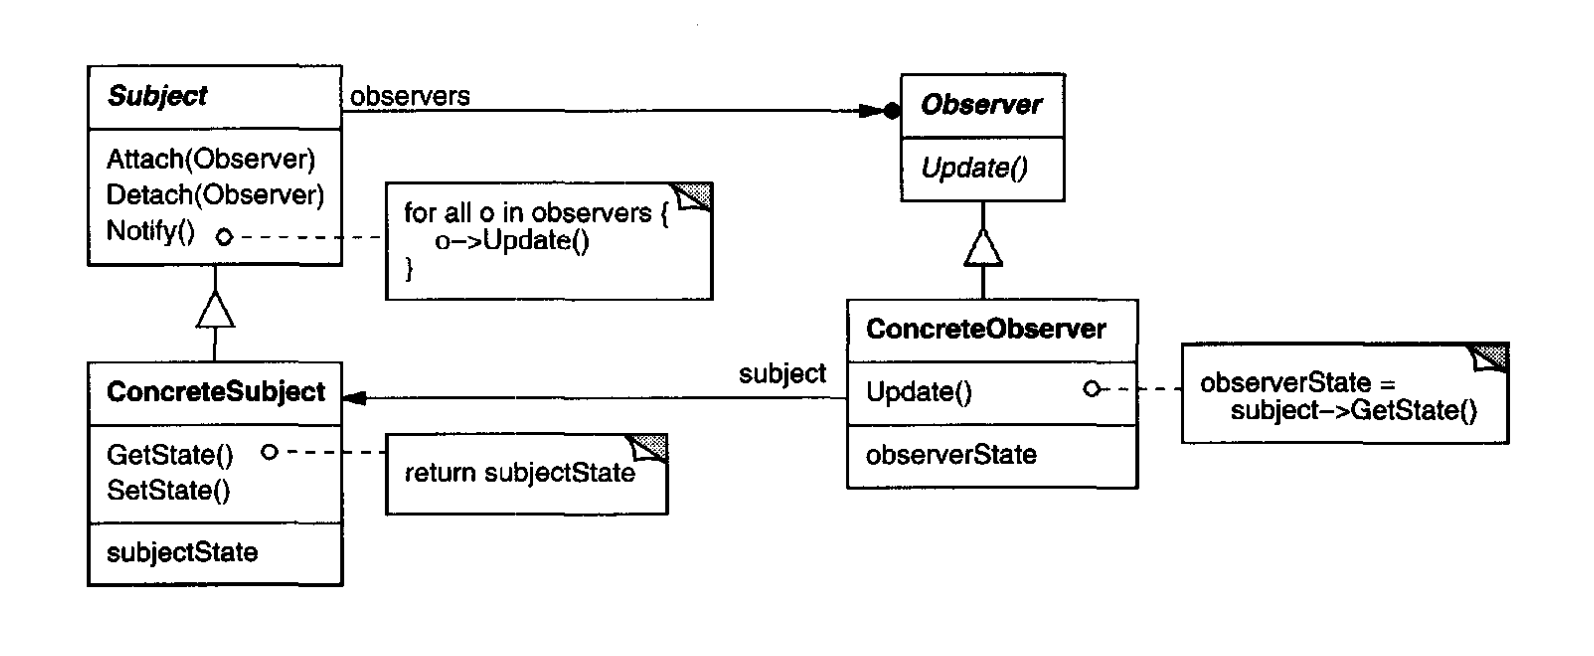
Also the book includes a class diagram to illustrate how could be implemented:
The React way
How does React implement the Observer pattern? Using hooks.
React components are notified to re-render by using hooks. For example the useState hook.
In this context, the state acts as the Subject, while the React component serves as the Observer that updates when notified.
Tiny counter
A simple (and very popular) example is a React component that displays a counter:
import React, { useState } from 'react';

const Counter = () => {
  const [count, setCount] = useState(0);

  return (
    <div>
      <p>You clicked {count} times</p>
      <button onClick={() => setCount(count + 1)}>
        Click me
      </button>
    </div>
  );
}
The initial state is 0 and the useState hook returns a pair: the current state value and a function to update it. Every time setState is called the value count will change and the <p> element will get “notified” and updated.
Having more than one state
A Counter is a small example, easy to follow. Let us try a scenario a bit more complex.
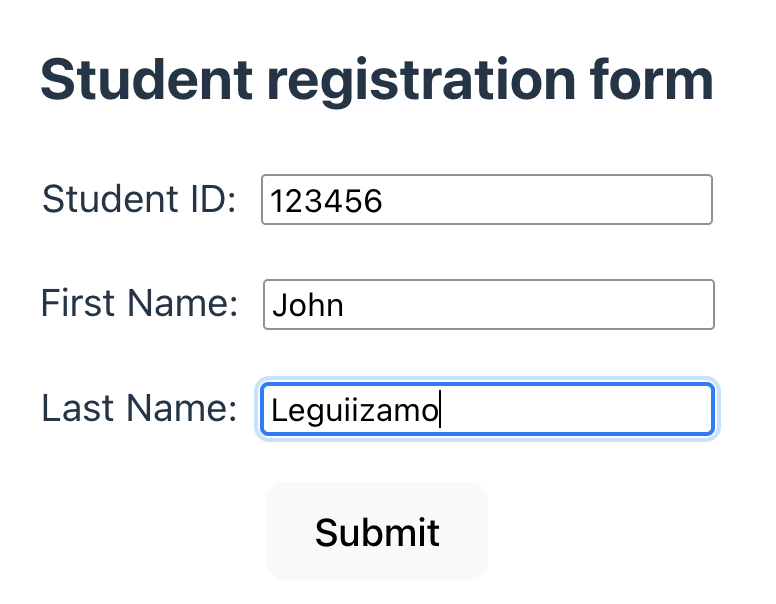
Imagine a form to enter information for a Student that has the following properties:
const student = {
  studentId: ...,
  firstName: ...,
  lastName: ...,
}
Thus we need the first state hook to update the student information (the full code can be found here):
  // State to store student data
  const [student, setStudent] = useState({
    studentId: 0,
    firstName: '',
    lastName: '',
  });
The student id is loaded from the database. We would like to show a message to indicate is loading:
  const [isLoading, setIsLoading] = useState(true);

  useEffect(() => {
    const finishLoading = (newId) => {
      // Update the student with the new id
      setStudent({ ...student, studentId: newId });

      // Turn loading off
      setIsLoading(false);
    };

    // Start the loading
    setIsLoading(true);

    // Mimic calling an API
    setTimeout(finishLoading, 800, 123456);
  }, []);

  if (isLoading) {
    return <h3>Fetching ID... please wait</h3>;
  }
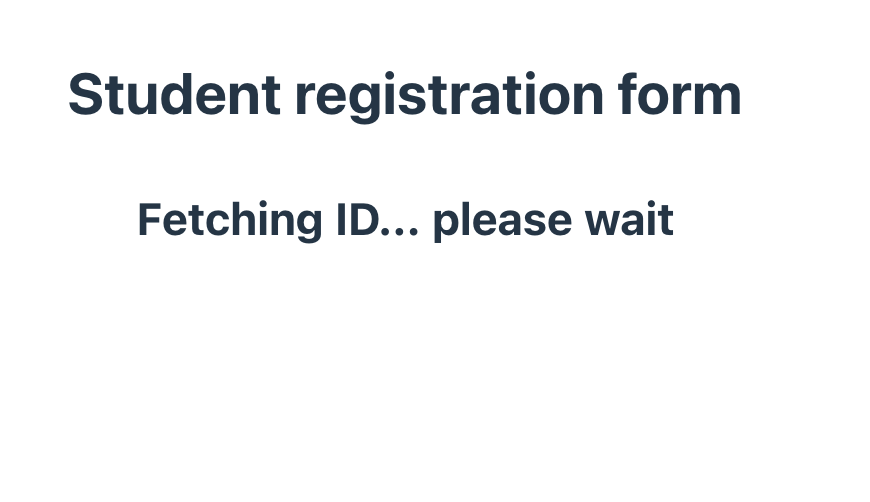
After the student id is loaded then the form will be shown.
const StudentForm = () => {
  // Handle form input change
  const handleChange = (e) => {
    const { name, value, type, checked } = e.target;

    setStudent({
      ...student,
      [name]: type === 'checkbox' ? checked : value,
    });
  };

  // Handle form submission
  const handleSubmit = (e) => {
    e.preventDefault();
    alert('Student submitted!');
  };

  return (
    <form onSubmit={handleSubmit}>
      <div>
        <label>Student ID:</label>
        <input type="text" name="studentId"
               value={student.studentId}
               readOnly="true" />
      </div>

      // the rest of the fields
      ...


      <button type="submit">Submit</button>
    </form>
  );
}
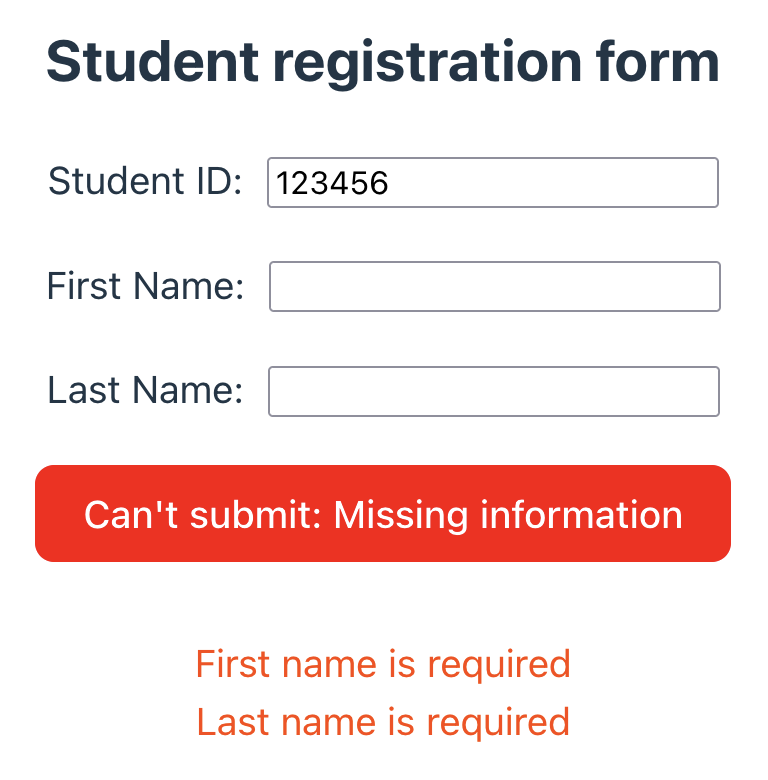
The form cannot be submitted unless the fields are not empty. That means we need another state hook to list the potential errors and another one to know when is OK to submit the form (used to enable the submit button):
const StudentForm = () => {
  // State to indicated if all the required
  // information is valid and can be saved
  const [canSubmit, setCanSubmit] = useState(false);

  // State to store validation errors
  const [errors, setErrors] = useState({});

  // Validate the fields when there is any change
  useEffect(() => {
    // Validate inputs
    const newErrors = {};
    // .... code here for validation

    setErrors(newErrors);

    setCanSubmit(Object.keys(newErrors).length == 0);
  }, [student]);

  return (
    <form ....>
      {canSubmit ? (
        <button type="submit">Submit</button>
      ) : (
        <>
          <button class="missing-info" disabled>
            Can't submit: Missing information
          </button>

          {Object.entries(errors).map(([k, v]) => (
            <div className="error" key={k}> {v} </div>
          ))}
        </>
      )}
    </form>
  )
}
To summarize the React component needs state to represent:
- A boolean value to indicate that loading the student id is in progress.
- The
Studentinformation. - A boolean value to indicate if all the information is present in order to submit the form.
- Validation errors to display on each field
And the dependencies between different states are as follow:
- The student information depends on finishing loading in order to obtain the student id.
- Identifying errors depends on the updates made to the student information.
- Being able to save the form depends on having or not errors.
When to consider useReducer
Though the previous example is not super complex, not only the amount of states needed increased but the dependencies between states also became more involved.
It is not hard to imagine a React component where there is a few more state hooks with more business logic attached to them.
As soon as the amount of state hooks grows and the updates triggered by dependencies between states are not trivial the reducer hook should be considered.
The basics
A reducer is a function that takes a state (sometimes called accumulator) and something else (that affects the state) and returns the same state.
The signature of the function would be (state: T, elem: E) -> T where T and E are generic types.
The concept already exists in most of the popular languages.
In JS the Array prototype as a reduce function. Here is an example used to sum all the elements in the array:
const array1 = [1, 2, 3, 4];

// 0 + 1 + 2 + 3 + 4
const initialValue = 0;
const sumWithInitial = array1.reduce(
  (accumulator, currentValue) => accumulator + currentValue,
  initialValue,
);
In python the functools module contains a reduce function. Here is the same example as above:
reduce(lambda x, y: x+y, [1, 2, 3, 4, 5])
As a hook in Reactthe concept is similar. From the documentation we obtain:
useReducer is a React Hook that lets you add a reducer to your component.
That means that you are going to use a hook that takes a reducer function:
const [state, dispatch] = useReducer(reducer, initialArg, init?)
The main differences are that now to change the state there is a function dispatch that will be called with an event that the reducer function will take and produce a new state.
Using the reducer hook
Let’s convert the previous example from multiple state hooks to a reducer so we can compare both approaches. The full code can be found here.
Because we need to define a reducer function let us review the events needed to interact with the form:
- Fetching the student id started and stopped.
- A field in the student model has changed.
The analysis for errors and if the form can be submitted will be done after handling the student change event.
The full code can be found here.
State must be read only. The update function needs to return a copy of the state with new values.
const studentReducer = (oldState, action) => {
  switch (action.type) {
    case 'student_changed':
      return changeStudentEvent(action.fieldName, action.value, oldState);
    case 'fetching_id_started':
      return fetchingIdStartedEvent(oldState);
    case 'fetching_id_finished':
      return fetchingIdFinishedEvent(action.newId, oldState);
  }
  throw Error('Action type invalid:' + action.type)
};
The state now includes the student information, the errors object and flags for isLoading and canSubmit:
const initialState = {
  student: {
    studentId: 0,
    firstName: '',
    lastName: '',
  },
  errors: [],
  canSubmit: false,
  isLoading: false,
};
The functions that update the state now they need to use the dispatch function to call the reducer function.
Putting it all together with the React component:
const StudentForm = () => {
  // State to store student data
  const [state, dispatch] = useReducer(studentReducer, initialState);

  // Handle form input change by dispatching an event to the reducer
  const handleChange = (e) => {
    const { name, value, type, checked } = e.target;
    dispatch({
      type: 'student_changed',
      fieldName: name,
      value: type === 'checkbox' ? checked : value,
    });
  };

  // Dispatches and event when fetching the id starts and ends
  useEffect(() => {
    const finishLoading = (newId) => {
      dispatch({ type: 'fetching_id_finished', newId });
    };
    dispatch({ type: 'fetching_id_started' });
    setTimeout(finishLoading, 800, 123456);
  }, []);

  if (state.isLoading) {
    return <h3>Fetching ID... please wait</h3>;
  }

  // Handle form submission
  const handleSubmit = (e) => {
    e.preventDefault();
    alert('Student submitted!');
  };

  return (
    <form onSubmit={handleSubmit}>
      <div>
        <label>Student ID:</label>
        <input
          type="text"
          name="studentId"
          value={state.student.studentId}
          readOnly="true"
        />
      </div>

      // rest of the form ...

    </form>
  );
};
Was it worth it?
Same level of effort
There is no much difference in the amount of code needed, is mostly moving a bit of the code outside the React component and changing the tests.
There is not a big difference in the amount of code needed. Using the reducer hook moves a bit of the code outside the React component and changes the tests (if you wish to separate the tests for the reducer function and the React component).
Easier to identify boundaries
Using a reducing function makes us analyze which events affect the React component and what information each event should contain. That kind of analysis is very helpful to identify which events belong to the component interaction with the user and which ones are actually related to “internal” logic between the different states.
Hiding internal logic between states
The dependencies between the different parts of the state stay hidden inside the reducer making the interactions with the reducer easier to understand and maintain.
Simpler to test
Having a reducing function with events simplifies quite a bit testing because helps use separate the model that view (React component) uses to render different parts. We could test separately the function and the component without the need of setting the state to a particular value in each test.
Having said that, we would have to expose the reducing function… only for testing purposes… and the dependency between the React component and the reducing function is hardcoded. Something to keep in mind.
What do you mean by hardcoded?
The reducer function used in the current code is hardcoded (cannot be changed):
const StudentForm = () => {
  // State to store student data
  const [state, dispatch] = useReducer(studentReducer, initialState);

  // .... rest of the code
}
Perhaps one option could be to pass the reducer function as an argument that by default contains the previous value:
const StudentForm = (reducerFn = studentReducer) => {
  // State to store student data
  const [state, dispatch] = useReducer(reducerFn, initialState);

  ....
}
The tests for the React component could be simplified because the reducer function passed could be a mock function.
On the other hand, now the test for the reducer function doesn’t have to cover any rendering, it can be treated as a test for a pure function instead.
Immutability FTW!
The reducer function requires a read only state. No mutability between events helps to avoid mistakes and simplifies testing.
The right state (of mind)
What is the right solution? Using a reducing hook can always do what a simple state does. When is it overkill though?
A bit of that decision is up to you. But, we can use the following rule of thumb:
For a simple state with little to no logic -> useState will probably work.
When there is more than one state and the code seems to be growing in complexity -> useReducer may be a better fit.
Of course, sometimes a bit of exploration is needed before making the right decision.
I have seen better!
Indeed I have! What if we could create a model that represents what the React component needs exactly?
No need to dispatch events but just call functions with clear meaning. I want to call studentChanged, or startFetchingId. I do not want to know if it is implemented with a reducer or something else.
Additionally we could pass that object as a parameter to the component, making the dependency between the source of the data and the representation explicit. Explicit dependencies mean the tests can pass a fake object and implement only the bits needed for the test.
This idea exists and it is called a ViewModel. A model dedicated solely to provide what a view needs, nothing less, nothing more.
In the next article of this series (part II) I will explore using view-models to represent the state of the component.
At this point, you may wonder:
Hey! Wait! Is this section a blatant cliffhanger?
I don’t know… is it?